Monday, May 1, 2017

When Your Food Budget Laughs At You

Every Friday, my husband's paycheck is deposited, just to turn around and leave my account again.  Oh, the joys of living paycheck to paycheck.  

About 4 months ago, we set up an account that $150 is deposited for food every week. That would give us $600 a month for food, but that NEVER happens.  Why? Well, this bill has to be paid, then that bill, then gas for the car. Oh, Netflix is coming out... 
And inevitably, that money we set aside for food, will be wittled down. Sometimes, I'll have $120, sometimes I'll have $100 or $75 or $55, sometimes less.  So what do I do when my budget is tiny for 5 people for 7 days. Well, first I panic.  Then, I ask my favorite fb group for budget friendly meals. Then I take stock of what I have, go shopping for what I absolutely need and come up with a plan.  

This week is one of those weeks.  And this is my plan: 

Yes, I called it "Cheap as Dirt Menu".  Why? Because I could and it reminds me that on weeks like this, I have to be Super Frugel (that makes me aound like a superhero). 

Everything on this menu is cheap to make, filling, and is delicious.  I should cook this way more often (wait, I didn't mean to say that, these weeks are WAY to stressful for me.)

Saturday, February 6, 2016

Super Bowl 50, Here We Come


It is that time of the year again.  The time of year where we sit around a TV, some to watch THE football game of the year, others to watch the commercials that occasionally are better then the game.  As important as the game (and commercials) is the food.  We don't want a fancy sitdown meal.  No, we want food that we can use our hands to eat.  Usually pizza, buffalo wings, veggie platter, chips, salsa, nachos, hot dogs, philly cheese sandwiches... If it can be eaten with our hands without having to look at our plate, that is the food for Superbowl.

However, what do you do when you need to cut down on carbs and or fats, whether for medical reasons or for a diet?  What happens if you have a vegetarian who doesn't want just the veggie tray with ranch?  What if you are craving all those Superbowl favorites that everyone else at your party is eating (because you know a veggie platter will not help you at all)?  Well, I got you covered.  I went through my favorites and created handheld food that may not be exactly what you are craving, but at least a close second.  (Actually, I like all of the above better then the originals, but then again I did make them).

I added lots of vegetarian options (that my meat eaters LOVE) that is more exciting then raw veggies and ranch.  And although these may seem difficult, they aren't.  The cheese crisps and cheddar cups are a little time consuming but they can be made up to a week ahead of time.  (Yes, I know super bowl is tomorrow, but for next time it is good to know you make them up way before you need them).

Here are the links to all the items in the above picture:

Buffalo Chicken Strips
 
Roasted Brocolli

Parmesan Crisps

Pizza Stuffed Mushrooms

Stuffed Sweet Peppers

Caprese Zucchini Cups

Chicken Chili Tacos in Cheddar Cups


I hope you all enjoy these recipes and be safe this weekend. 


Low Carb Chili Cheese Nachos, Yes, Please


Okay, maybe these aren't chili cheese nachos but they sure taste like them.  

When I was in high school, and I would be at competions, I would always get the chili cheese nachos.  However, the mountain of tortilla chips, topped with canned chili, nacho cheese and sour cream was far from good for me.  That doesn't keep me from wanting them however.

So instead I made these cheddar cheese crisps that I filled with chicken taco meat that I added cumin along with half a can of tomatoes, with green chilies and onions.  Then I topped it will my favorite taco toppings.  The result is a super yummy hand held low carb taco cup that tastes just like the chili cheese nachos from my youth.

The trickiest thing about this dish is the cheese cups.  They are very similar to my parmesan crisps except instead of letting them cool on the baking sheet you have to form them by pushing them into standard muffin tins.  Since this has to be done quickly, I would suggest only making 3 of these at a time until you get in a rhythm but no more then 6 at a time, or they will never get formed into cups before they cool.

Here is a quick tutorial on how to make the crisps:


Spread 1 1/2 Tbsp cheddar cheese on a silpat or parchment
paper to create a 3 inch circle.  Do not place too close
to each other as the cheese will spread as it cooks


After baking for 10 minutes in a 400 degree oven,
The cheese will be lacy and golden.
When forming the cups I will leave the cheese crisps in the oven
to keep then pliable and pull them one at a time.  They will harden
in about 15 seconds so have your muffin tin waiting for you on top
of your stove.
One at a time place a crisp on top of  a muffin cup.  Using the back of a spoon
or a rubber spatula sink the crisp into each well to create cup.
Let cool before filling.

I made the mistake of filling inside the cups.  They are much easier
to remove from the tin BEFORE filling


These crisps can be made in advance.  Store covered to prevent cheese crisps from getting stale.

Chicken Chili Tacos in Cheddar Cups

1 lb Ground Chicken Breast (or Turkey)
2 teaspoons taco seasoning (use your favorite kind)
1 tsp cumin
1 tsp onion powder
1 tsp garlic powder
1/2 cup vegetable stock
1/2 a corn tortilla, minced (this really helps it taste like chili)
1/2 cup Rotel Tomatoes with onions and green chilies
1 cup sharp cheddar cheese (this will make 12 cups total)
Your Favorite taco toppings 
( I used cotija cheese, jalapenos, tomatoes, red onions, black olives and sour cream)

Preheat oven to 400 degrees fahrenheit.  

Place standard muffin tin close to stove, set aside.

Line a baking sheet with parchment or silicone baking mat.  Place 1 1/2 Tbsp of cheddar cheese baking sheet.  Using the back of your spoon spread out the cheese to create a 3 inch disc (see pictures above).  Bake for 9-10 minutes or until the cheese is golden brown and lacy.  While keeping the rest of the cheese in the oven (just leave the door to my oven open with the rack out slightly to make it easier to grab the cheese while still keeping it warm), remove one cheese disc (it will be pliable and easy to shape for about 15 seconds), place over a muffin cup and carefully push inside using the back of the spoon or a rubber spatula.  Let cool completely before removing to a serving tray (or storing them for later).  Do not cook more then 6 crisps at a time as they will cool before you can form them.  I would start with 2 or 3 until you ger a rhythm.  These take a little while, so make these ahead of time.

In a bowl combine meat, cumin, onion powder, garlic powder, taco seasoning, corn tortillas, and tomato with chilies.  Cook over medium heat in a medium saute pan.  When the chicken is cooked add vegetable stock and cook until all liquid has disappeared. Spoon chicken chili taco meat into cheese cups.  Top with favorite taco toppings.  Or create a taco bar and let everyone add the toppings they like. 

Makes 12 taco cups. 

(You may have extra meat depending on how full you make them)


Step Aside Cheese Crackers, There Is A New Crisp In Town

Parmesan Cheese Crisps (right) served with Hard Salami, Pepperoni, Dill Pickles and Black Olives

I like cheese crackers as much as the next girl, but once again, crackers contain wheat and wheat and me don't get along.  Instead I like to make cheese crisps.  These awesome things are actually just cheese and seasoning baked passed melting into a delicious crisp.  I am serious that is it.  I paired them with some meat, pickles and olives, because, who doesn't like lunchables.  This just has the cheese and crackers combined.

These crisps can be made in advance, just store them in an air tight container or bag at room temperature until you are ready for them. And they are really easy to make.  

Confessions of a Food Nerd Parmesan Crisps

1/4 cup shredded parmesan
1/4 tsp red pepper flakes
1/4 tsp garlic powder
1/4 tsp ground black pepper

Preheat oven to 400 degrees.
Line a cookie sheet with parchment paper or a silpat (silicone baking mat).  Set aside.

Mix together all ingredients.  Place 1/2 tablespoons of cheese mix on cookie sheet.  using back of spoon spread the cheese out to create a 2 inch disc.  Bake in a 400 degree oven for 10 minutes or until cheese is lacy and golden brown. Remove from oven and let cool.  Cheese will harden as it cools.  This will make 8 crisps.

Hey, Bruschetta! Where's Your Bread?


I love bruschetta.  Unfortunately, the wheat makes my join ache and swell.  I didn't care in my 20's, but now that I am almost 40, I find that anything that makes me hurt, I try to avoid. But that doesn't mean I can't have have the bruschetta toppings.  It just means I have to change the base.  So I changed it to zucchini cups. 

The hardest part about making these is: 1) not eating the caprese salad (tomato, basil, and mozzerella) before it has had time to set (trust me, this is important) and 2) to not bust through the bottom of the zucchini. The first one is sheer will,  the second one just takes practice and either a melon baller or a metal tablespoon.  I used the latter.


First I cut the zucchini  about an inch thick (I got 7 out of a medium (8 inch) zucchini).  The I gently put the spoon in along one side of the zucchini slice and turned the zucchini in a circle.  Don't dig to hard, you don't want to bust the bottom.  Also be careful how close you get to the edge.  It is easy to redirect the spoon if you seem to get to an edge.  (A melon baller is a little easier to use, but it won't be as smooth or pretty).

Then I boiled the zucchini for 2 minutes, with the well side up (make sure to get water inside the hole to cook it evenly on both sides). 


Remember when I said that the hardest part was to not eat the caprese topping? Let me show you why.


Then I just had to put them together.


Pretty aren't they?


Confessions of a Food Nerd Caprese Zucchini Cups

2 medium zucchinis
2 medium roma tomatoes, diced
2 ounces of mozzerella, cut into cubes (I use string cheese, cut it in quarters lengthwise, then cut into cubes)
2 Tbsp basil, chiffonade (chiffonade means "cut into ribbons".  Stack basil leaves, roll tightly like you would a cigar, then slice across the leaves as thin as possible)
1 Tbsp extra virgin olive oil
2 garlic cloves, minced
1/2 tsp salt

In a small bowl, mix together tomatoes, mozzerella, basil, garlic, salt, and olive oil.  Set aside and let marinade for at least a half hour at room temperature.  The longer you can let it marinate the better, (if you let it marinate overnight, let it set out for at least a half hour before placing in the fridge until use).

Bring 1 gallon of salted water to boil.

Cut the zucchini into 1" discs.  Using a melon baller or metal Tablespoon, carefully cut out the center of each piece of zucchini, leaving sides and a bottom (you are making cups).  Place in boiling water and cook for two minutes, or until cups are bright green, with the well faced up (make sure to get water inside the well so the cups cook evenly).  Remove cups from water and place them upside down on a plate to drain, let cool 10 minutes.

Place zucchini cups on serving tray, well side up.  Fill zucchini cups with caprese salad. Serve

(If you like you can drizzle with balsamic vinegar, but since my husband is not a fan, I do not at it).


I Am A Wimp, But I Love Jalapeno Poppers


What is a girl to do? I love jalapeno poppers, but I don't love the heat and sometimes the breading gets in my way.  And sometimes I don't want anything deep fried.

Well, I don't know about you, but this girl changes around the recipe. 

I made some executive decisions when making the dish.  First, I changed the jalapenos into mini sweet peppers.  Then, I left the skins on because, well, I can be lazy.  Besides I didn't want to roast the peppers before stuffing them.  I wanted to keep the shape and stem of the peppers and roasting them to remove the skin would ruin that.  Instead of cutting the peppers in half, I cut off just one side, removed the seeds and membranes before stuffing them with a mixture of cream cheese, garlic powder, and scallions.  Then I put the pepper back together. Don't they look great with the tops back on.

Here are the peppers cut, filled, and one with the top back on ready to go in the oven.

Confessions Of A Food Nerd Stuffed Sweet Peppers

12 mini sweet peppers
4 ounces cream cheese, softened
2 Tbsp scallions (or green onions), sliced
1/2 tsp garlic powder

Preheat oven to 400 degrees.

Cut one side off of each pepper.  Remove seeds and membranes.  Place on a cookie sheet.  Set aside.
In a small bowl, mix together cream cheese, scallions, and garlic powder.  Stuff each pepper with cream cheese mixture.  Put tops back on pepper.  Bake in a 400 degree oven for 12-15 minutes, or until peppers are soft.  Serve.


Give Me Pizza (But Hold The Crust)


Raise your hand if you love pizza.  Yeah, my hand is up, too.  But, when you are trying to cut down on gluten or carbs, the crust isn't something you want.  I have seen pizzas on cauliflower cheese crust, on zucchini, even as dip.  However,  I wanted something a little different. So, I decided to turn one of my favorite pizza toppings into the "crust" instead. Yep, I made pizza stuffed mushroom caps.  I mean, why not?  You know what, I like it much better this way.  They are so good.  These in the picture are pepperoni, red onions, olives, but feel free to use any toppings you would like.  Sausage and Peppers? Sure.  Canadian Bacon and Pineapple? Delicious. Just Cheese? My daughter's favorite.

Confesssions of a Food Nerd Pizza Stuffed Mushrooms

1 lb mushroom caps, stems removed
1/2 cup of your favorite pizza toppings, diced (I used pepperoni, red onion,  and black olives)
1/4 cup tomato sauce or crushed tomatoes 
1 tsp pizza seasoning (or italian seasoning)
2 Tbsp parmesan cheese
1 cup mozzerella cheese

Preheat oven to 400 degrees. 

Place mushroom caps on cookie sheet, set aside.
In a small bowl, mix together pizza toppings, pizza (or italian) seasonings, parmesan, and tomato sauce (this is your filling). Stuff mushrooms with filling (I stuff in as much as I can, I mean the best part of pizza is the toppings, isn't it?).  Top each mushroom cap with mozzerella (you may have extra mozzerella or you may need more, that depends on how much cheese you like on your pizza). Bake in a 400 degree oven for 10-12 minutes or until the mushrooms are soft to the touch and the cheese is melted.  Serve.  

(Remember the bigger the mushroom caps the more toppings you can stuff inside)

Broccoli Over Chips, Please


That is what my daughter says to me now.  She is seven and she has decided that the ONLY vegetable she likes is brocolli.  So I am going to milk that for all it is worth.  

She doesn't care how we have it: hot, cold, steamed, sauteed, roasted, covered in cheese.  As long as it is brocolli she is a happy camper.  But to turn it into a snack food that is chip worthy, I took inspiration from some friends.

Confessions of a Food Nerd Roasted Broccoli

1 lb fresh broccoli florettes (or frozen brocolli florettes, thawed)
1 Tbsp extra virgin olive oil
1/2 tsp salt
1/4 tsp red pepper flakes (optional)
2 cloves garlic, minced
2 Tbsp grated parmesan

Preheat oven to 400 degrees.  
In a medium bowl, mix together all ingredients.  Spread broccoli on to a cookie sheet.  Bake in a 400 degree oven for 15 minutes. Stir broccoli.  Bake for another 5 minutes or until parmesan has crisped and broccoli has started to carmelize (get brown in places). Serve.

Why Fry, Buffalo?


I love buffalo wings.  There is something so satisfying about chicken wings dredged in cornstarch or flour, deep fried, tossed in a mixture of butter and hot sauce, then served with carrots, celery, and blue cheese dressing.  However, it is not very healthy.  In the past I wouldn't have cared, but now that I am almost 40, my health (as well as my families) is always on my mind.  So I gave myself a task.  To turn this deep fried, butter/hot sauce soaked, blue cheese dipping bar staple into something that I would serve my family.  

My solution?  To bake it of course.  But that wouldn't get me that delicious buffalo flavor I crave. I also didn't want all that chicken skin that is on wings (I know, that is what makes them so good, but I am trying to make it healthier, remember).  I decided I would switch my wings to chicken tenders (or chicken breasts cut into strips) and marinate them to get them the flavor that I crave.   The next thing I changed was the blue cheese dressing. (I know, I know, that is the best part.  But the blue cheese adds extra calories and frankly my husband doesn't like it.)  It became a tangy ranch dressing that made using yogurt, sour cream, and ranch dip mix.

Why am I babbling when I can just give you the recipe?  Okay here it is:

Confessions of a Food Nerd Buffalo Chicken Strips

1 lb chicken tenders, or chicken breasts cut into strips
1/4 cup Franks Red Hot or you favorite hot sauce
1/4 cup water
2 tsp ranch dip powder
1 tsp garlic powder

Place chicken in a ziploc, set aside.  In a bowl, mix together hot sauce, water, ranch powder, and garlic powder. Pour over chicken.  Remove as much air from the bag as possible.  Move the chicken around inside the bag to coat with sauce.  Place in refrigerator and let marinate for 1-2 hours.

Preheat oven to 400 degrees.  Line a cookie sheet with parchment paper (or lightly greased).  Remove chicken from marinade and place on cookie sheet.  Place cookie sheet in oven and bake for 15-20 minutes, or until chicken reaches an internal temperature of 165 degrees (or until juices run clear when you cut open a tender).  Remove from oven and let rest for 10 minutes.  Serve with carrots, celery sticks, and ranch dressing.

Confessions of a Food Nerd Ranch Dressing

1/2 cup plain yogurt
1/2 cup sour cream
1 pkt of ranch dip mix (or 1 1/2 Tbsp ranch powder)

Mix everything together, let set for 15 minutes before serving.


Tuesday, November 24, 2015

Why Does The Bread Have To Be Boring?


I ask you this, how much thought do you actually put into the bread you serve along with the turkey and all those sides?  Well, let's think about this a little...

When it comes to planning the big Thanksgiving dinner,  a lot of attention goes into planning.  One has to think about how to prepare the turkey (and there are a lot of different ways you can go about that: brine, rub, inject, butter under the skin, butter over the skin, bacon on top of the skin, cook breast side up, cook breast side down, cook in the oven, cook in an electric roaster, smoking, frying, keep it whole, break it into parts, cut out the back bone before flattening (this is known as spatchcocking,  yes that is the actual term)...  Woops, I digress).  Then a lot of decisions must be made on all the different sides that go into the meal.  Such as which sides HAVE to be on your table, which sides do you not want on your table, which new sides, if any you would like to add to your holiday dinner.  Then you have to think about desserts, after all how you finish the meal is just as important as the the turkey.  By the time you finish writing the menu, your brain has turned to jello.  Then you remember that you forgot to add the bread.  A can of bread dough or a bag of rolls to the rescue.  Admit it, not much thought goes into the bread.  I mean, why would you? It is pretty much thought out for you.  

Well, this year I wanted something different, something special, something that will enhance my meal rather then just something to sop up the gravy or to use for sandwiches the next day.  So this year I decided on biscuits, Cheddar Cheese Biscuits to be exact.  Yum, right? 

To make it easier on the big day, I actually make and cut my biscuit dough in advance, freeze it, then bake them while I am waiting for my turkey to rest.  In fact, I actually make a double batch and keep some in my freezer for those days I want a really good biscuit breakfast sandwich or a quick side with my chili or baked chicken. 

Here is how I make them:
The first thing to do is to gather all your ingredients and utensils.
(also needed, but not pictured: a fork, glass or biscuit cutter, ungreased baking sheet)
In a bowl, combine flour, baking soda, baking powder, and salt (I used Himalayan pink salt because that is what I had on hand. Table salt or kosher salt will work here as well).

Next, I add in some flavor:  cracked black pepper, garlic powder, onion powder, and fresh chopped parsley.

Whisk together.

Let me take a moment here to give you a little tip when it comes to biscuits (as well as pie crusts).  The secret to a flaky biscuit is the little pockets of steam that is created when cold butter meets a really hot oven.  It is imperative to a tender product to have little lumps of fat running through your dough.  However, I hate doing all the work it takes to cut the butter into the flour.  Sure I could use a food processor to do this but I really prefer to make these by hands.  So, to make my job easier I use a box grater.


Yep, a box grater.  I keep the shortening (I use crisco sticks) and butter in the freezer this keeps it nice and solid and fairly easy to run along the grater.  I usually do this directly into the flour mix, but I wanted you to see it.  Admittedly the shortening is softer and much easier to grate then the butter.  I grate the shortening in first, toss it in the flour mix using my clean hands or a fork, then grate the butter and toss that in the flour mix, too.  Don't remove the fats from the freezer until it is time to grate them.  You don't want it do start to soften, making it much more difficult to work with.


Okay, now where was I?  Oh yeah:

Time to add the fats.  Grate the shortening and butter into the flour mix (sorry it is so hard to see, but they are both in there).

Using either a fork or your impeccably clean hands, toss the shortening and butter strands into the flour.  Breaking up any large lumps (anything bigger then a pea) that may occur.  If you use your hands try not to manipulate it too much as the heat of your hands can melt the butter.

Now it is time to add the cheese.

Toss together.  Now you are ready for the wet stuff.

And when I say wet stuff, I mean buttermilk.
(sorry about the pic, my flash didn't like the buttermilk)


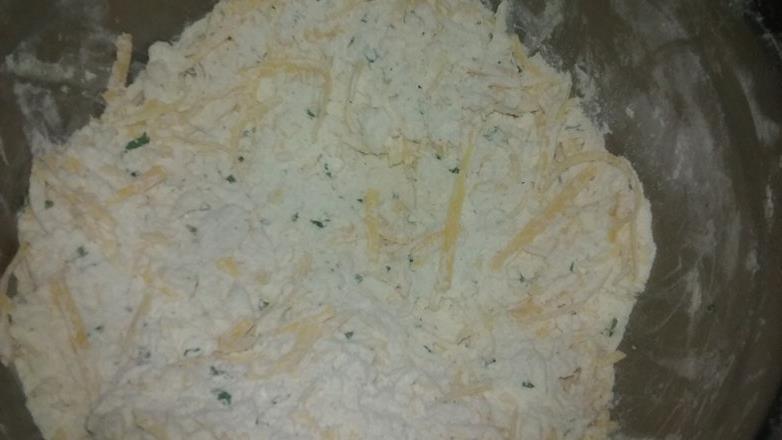
Use a fork and mix together to just combined.  There will be some flour left on the bottom, but we will take care of that on the next step.  If you mix it too much here you will overwork your biscuit.  Overworked biscuit equals hockey puck.  You want it to look like "a shaggy mess".

On a lightly floured cutting board, pour out the biscuit dough.  any flour mix that did not get mixed in pour evenly on top of your dough.

Using your hands, gently push dough out to about an inch thick.
(This is a double batch in this picture.  A single batch will not be this big).
Now fold the dough in half.

Pat out until it has a one inch thickness.

Fold the dough in half again (in the opposite direction this time), and pat into an inch thick.  You want to do this a total of 5 times (So, three more times from this point).

At this point, after the last fold, I gently use a rolling pin to smooth out the top of the biscuit dough.  

Time to cut.  I use a 3 inch biscuit cutter, but a floured glass will work here to.  Cut the biscuits as close together as possible, to reduce the amount of scraps.  In a double batch, I can get 15-16 biscuits cut at this point.

Place biscuit rounds on an ungreased cookie sheet.
Now about all those scraps, I just can't make myself throw out that much dough.  I know if I am gentle, I can do one more cutting with it.  So now to get the dough ready.

Move all the scraps together so that there is very little space between them.  And gently press them together.

Now we fold.  Just like we did last time.  But this time only twice.

Pat the dough out to an inch thickness.  It is now ready to cut.  (I will normally get 2 or 3 more biscuits.  They won't be quite as tender, but they won't be tough).  Any remaining scraps, discard.
Now, you have a beautiful pan of biscuits all ready for the freezer.  Wait, did I say freezer?  

Yes, I did.  And the reason why is my next secret to a tender biscuit.  Remember, when I said that a flaky biscuit comes when the hot oven meets cold butter and that causes little pockets of steam.  Well, all that folding and cutting has caused your butter to get warm.  So I put my pan of biscuits in the freezer for 10 minutes before baking.  This chills the dough enough to harden the butter.  While I wait for it to chill I preheat my oven to 450 degrees.

This is a good time to mention that you don't need to bake off all the biscuits you cut.  Simply put the ones you want to cook on another pan and leave the rest of them in the freezer to get hard.  When the biscuits are frozen I put them in ziplocs, one meals worth per ziploc.  When it is time to bake, I place my biscuit rounds on a pan and let them sit at room temperature for 20-30 minutes so that they start mostly thawed but are still cold.  If I bake them from frozen, I won't get the extra lift from when the butter meets the heat. 


Speaking of heat, now that my oven is hot, I can bake my biscuits.  I bake my biscuits for 10-12 minutes at 450 degrees.  


The bottoms will be golden brown and the biscuits will have a light golden crust.  Remove from oven and let rest 2 minutes.  Look at all those layers we have built. You can see them without even having to open the biscuit.  Now, I like my biscuits like this.  However, if you are like my Dad and like to "gild the lily", brush these with melted garlic butter as soon as they come out.

While biscuit and pan are still hot, use a spatula to gently loosen any cheese that might have melted onto the pan.  If you wait for the pan to cool and the biscuits to fully set, the biscuits will be stuck to the pan because of the cheese.  You can combat this by baking the biscuits on parchment paper, I just don't seem to have it on hand when I make biscuits.

The only thing left to due is to transfer them to a serving dish (or in my case a pie plate) and enjoy.


Oh and these make a delicious base for a homemade breakfast sandwich.


Cheddar Cheese Biscuits
2 cups flour
1 tsp salt, kosher or regular salt
1 TBSP baking powder
1/4 tsp baking soda
1/2 tsp black pepper
1/2 tsp granulated garlic
1/2 tsp granulated onion
2 TBSP minced parsley
1/4 c shortening, frozen
1/4 c butter, frozen
3/4 c shredded sharp cheddar cheese
I c buttermilk

In a bowl, combine flour, baking soda, baking powder, salt, pepper, granulated garlic, granulated onion, and parsley. Whisk together.  Grate frozen shortening and butter using a box grater and toss with flour mixture, breaking up any pieces bigger then a pea.  Add cheese and toss to combine.  Add buttermilk all at once and stir combined. The dough will not be smooth and in fact will look "shaggy" (see picture above). Transfer dough to a floured cutting board, pouring any flour that wasn't mixed in evenly across the top. Pat dough out until it is approximately one inch thick, fold dough in half, pat out again to one inch thick, fold dough in half, pat out to one inch thick.  Fold dough three more times.  Pat or gently roll dough out to one inch thick.  Using a 3 inch cutter or water glass to cut biscuits.  Place on an ungreased or parchment lined baking sheet. Gently push scraps together, pat together, and fold twice.  Cut dough into biscuits. Discard Scraps. Place biscuit rounds on baking sheet and place baking sheet in the freezer for 10 min.  Preheat oven to 450 degrees.  Bake at 450 degrees for 10-12 minutes.  Let cool 2 minutes, then, using a spatula gently loosen any biscuit that may be stuck due to the cheese .  Makes 8-10 biscuits.